Once you've got your new hair extensions, the secret to keeping them looking incredible isn't some complicated, time-consuming ritual. It's really about consistency and treating them with a little extra TLC. Think of it this way: your extensions don't get the natural oils from your scalp that your own hair does, so you have to provide that moisture and care yourself. A few simple, daily habits are what will truly protect your investment and keep your hair looking seamless and stunning for months.
Thank you for reading this post, don't forget to subscribe!Your Essential Guide to Flawless Hair Extensions
Getting extensions is just the beginning of your hair transformation. The real magic, and the difference between a look that lasts a few weeks versus one that lasts for months, comes down to the aftercare. Knowing how to maintain hair extensions is everything. The goal is simple: create a routine that protects both the extension hair and the attachment points, whether you have tape-ins, keratin bonds, or wefts.
I always tell my clients to treat their extensions like their favorite cashmere sweater—they're a luxury item and need to be handled gently to avoid damage. A mindful approach to your daily and weekly habits makes all the difference in their lifespan and how good they look.
The Non-Negotiables of Extension Care
There are a few core practices that are absolutely fundamental to keeping your extensions in prime condition. These habits are your first line of defense against the most common frustrations like tangling, slippage, and that dreaded dry, brittle feeling.
The principles are surprisingly simple: be gentle, keep them moisturized, and avoid putting too much tension on the bonds. With the right care, high-quality human hair extensions can easily last between 3 to 6 months, sometimes even longer.
The secret to long-lasting hair extensions isn't complicated—it's consistency. Small, daily habits have a far greater impact than occasional intensive treatments. Protect your investment by making these simple steps part of your routine.
Building these habits into your daily and weekly schedule is the foundation of a solid maintenance plan. For a deeper dive into specific techniques, check out our complete guide on mastering hair extension maintenance tips.
Daily and Weekly Extension Care Checklist
To make things easier, I've put together a quick checklist. This little table breaks down the most essential tasks for maintaining any type of hair extension, explaining why each step is so important.
| Maintenance Task | Why It's Crucial | Recommended Frequency |
|---|---|---|
| Gentle Brushing | Prevents tangles and matting at the roots. | 2-3 times daily |
| Protective Night Style | Reduces friction and prevents tangling while sleeping. | Nightly |
| Sulfate-Free Washing | Cleans without stripping essential moisture. | 1-2 times per week |
| Conditioning Ends | Restores hydration since extensions don't receive natural oils. | Every wash |
Think of this as your cheat sheet for gorgeous hair. Sticking to this simple schedule will keep your extensions smooth, healthy, and seamlessly blended with your natural hair.
Mastering the Art of Washing Your Extensions
Washing your extensions isn't like washing your own hair. It’s a completely different ballgame. Your natural hair gets a constant supply of protective oils from your scalp, but extensions don't. This makes them incredibly prone to drying out and tangling if you’re not careful.
The right technique is less about scrubbing and more about gentle, deliberate care. A good wash can hit the reset button, getting rid of product buildup and bringing back that fresh, seamless look. And it all starts before you even turn on the water.
The Pre-Wash Detangle
I can't stress this enough: the single most important step in your entire routine happens before your hair gets wet. Trying to wash tangled extensions is a one-way ticket to a matted mess and potential damage. Always, always start by detangling on dry hair.
Grab a soft bristle brush or one made specifically for extensions. Start at the very ends and slowly, patiently work your way up toward the roots. As you brush, use your other hand to hold the base of the extensions firmly against your scalp. This simple move prevents any tugging on the bonds, tapes, or wefts—which is the number one reason extensions slip or get damaged.
This infographic lays out the perfect brushing technique. It’s a fundamental skill for keeping your extensions in prime condition.
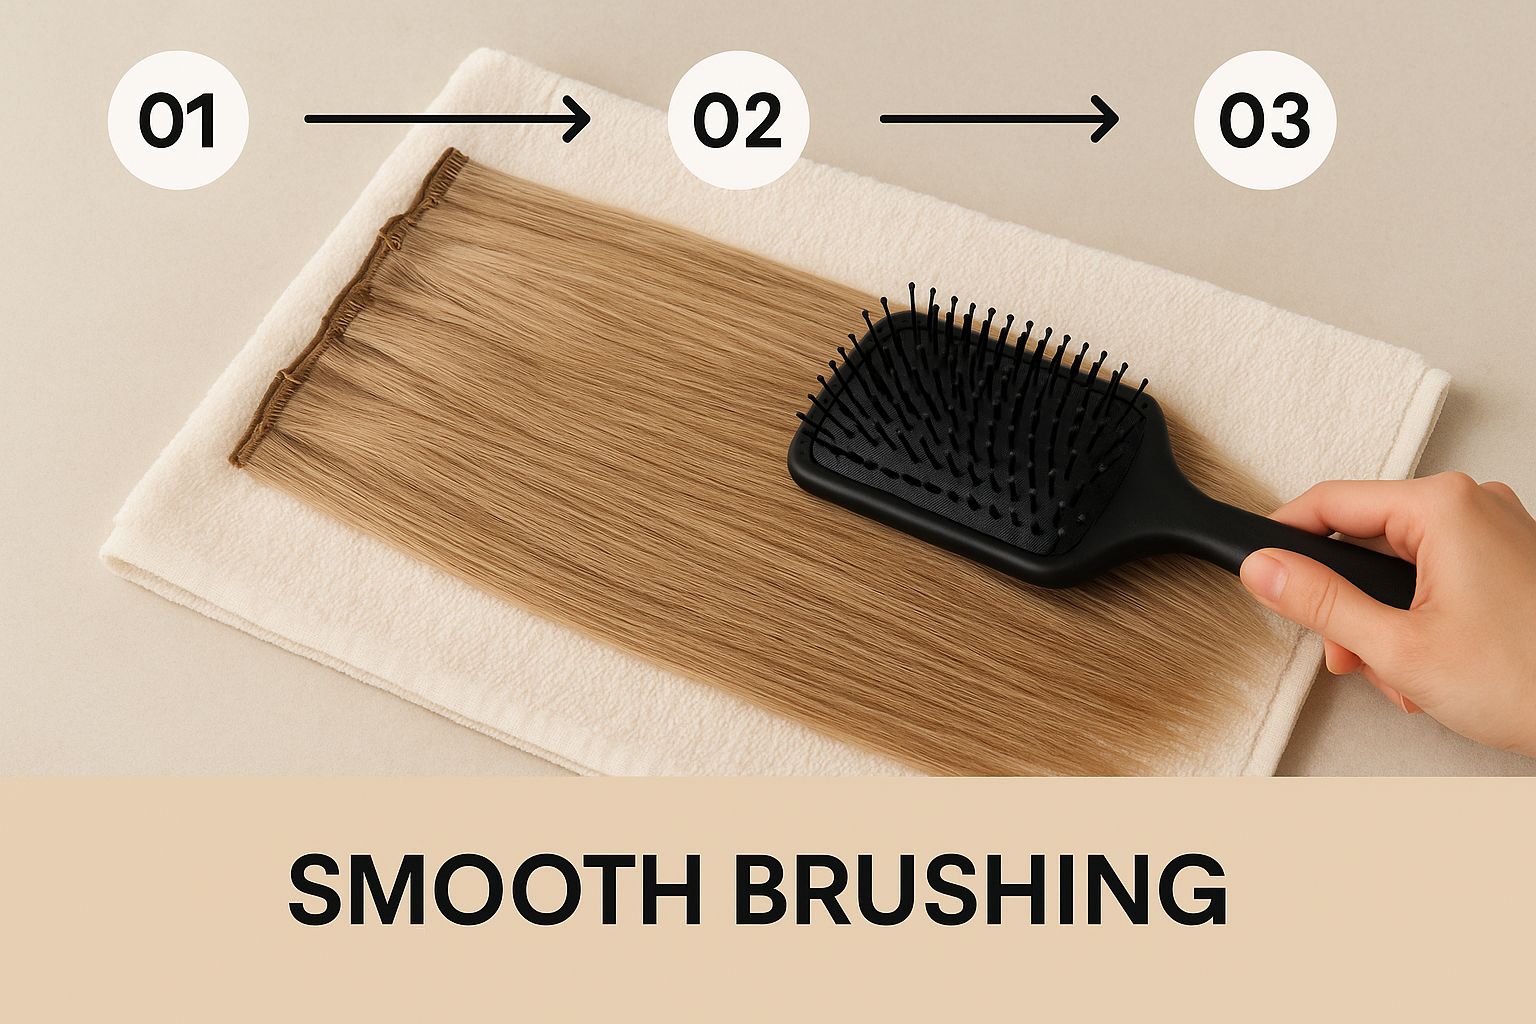
As you can see, the trick is to work from the bottom up. It’s all about preventing any tension on the attachment points.
The Right Way to Shampoo
Once your hair is completely free of knots, you’re ready to wash. The two things that matter most here are your product choice and how you apply it. The wrong shampoo can strip the color, dry out the hair, or even dissolve the adhesive on your bonds or tapes.
You absolutely must use a sulfate-free shampoo. Sulfates are harsh detergents that will make your extension hair brittle and lifeless over time. Think of a professional, extension-safe shampoo as a non-negotiable part of the deal.
Here’s the right way to use it:
- Get your hair completely wet with lukewarm water. Make sure the showerhead is pointing down your back to keep the hair flowing in one direction and avoid creating tangles.
- Put a small amount of shampoo in your hands first and work it into a lather before it touches your hair.
- Focus on your scalp. Gently massage the shampoo into your roots and natural hair.
- Don't scrub the actual extensions. Just let the soapy water run down through the lengths and ends as you rinse.
This "flow-down" method is more than enough to get the extension hair clean without causing friction or putting stress on the attachments.
Strategic Conditioning for Hydration
Conditioner is your best friend for keeping extensions silky and manageable, but you have to be smart about where you put it. Conditioner is packed with oils and silicones that create slip—great for detangling, but a total disaster for your bonds.
Never apply conditioner directly to your roots, bonds, tapes, or wefts. These ingredients are designed to make things slippery, and they can easily break down adhesives, causing your extensions to slide right out. This is easily the most common (and expensive) mistake people make.
Your conditioning routine needs to be targeted. Only apply it where the hair truly needs it.
- After you've rinsed out all the shampoo, gently squeeze the excess water out of your hair.
- Take a good amount of conditioner and apply it only from the mid-lengths down to the ends.
- Work the product through the ends with your fingers or a wide-tooth comb.
- Let it sit for a few minutes to really soak in, then rinse thoroughly with cool water. This helps seal the hair’s cuticle, which adds a beautiful shine.
Experts in the hair industry agree that this is the gold standard for maintenance. As you can discover more about the hair extension market, the best practices always come back to gentle washing and smart conditioning. By keeping conditioner away from the attachments, you give the lengths the moisture they desperately need while ensuring your bonds stay strong and secure.
How to Brush, Dry, and Style Without Damage
Once you've nailed the washing routine, what you do next is just as crucial. The way you brush, dry, and style your extensions can make or break them—literally. This is where so many people go wrong, and it’s the quickest way to turn a gorgeous investment into a tangled mess.
Think of your extensions like a luxury fabric. You wouldn't treat silk like denim, right? The same principle applies here. Aggressive handling, especially near the attachment points, will cause breakage, slippage, and damage to both your extensions and your natural hair.
The Right Tools and Techniques for Brushing
First things first: your brush matters. A lot. That standard paddle brush with little balls on the tips? It's a nightmare for extensions. It will snag on bonds, catch in the weft stitching, and pull your tapes right out. Your best bet is to invest in a brush made specifically for extensions.
A loop brush is fantastic because its looped bristles are designed to glide right over the attachment points without a single catch. If you don't have one, a wide-tooth comb or a soft, pure bristle brush are also solid, safe choices.
Now for the technique. This is non-negotiable.
- Start at the bottom. Always begin brushing from the very ends of your hair and gently work out any tangles there first.
- Move up slowly. Once the ends are clear, move up a few inches at a time, detangling each section before moving higher.
- Hold the base. This is the secret sauce. Use your free hand to hold the hair at the roots, right against your scalp.
By holding the base, you're preventing any tension from yanking on your bonds or wefts. This one simple habit is the number one way to prevent premature slippage. Make it a ritual to brush this way a few times a day—especially when you wake up and before bed. It keeps everything smooth and knot-free.
Safe Drying Practices for Longevity
How you dry your extensions directly impacts their texture. The wrong method can leave them feeling dry and brittle, while the right one preserves that silky finish.
Honestly, air-drying is your best friend. It’s the gentlest way to dry your hair and puts zero heat stress on the strands. After washing, just gently squeeze the excess water out with a towel—please, never rub or wring them out! Let them air-dry as much as you can, ideally until they’re about 80% dry, before you even think about picking up a blow dryer.
But let's be realistic, we don't always have time for that. If you have to blow-dry, here’s how to do it safely:
- Heat protectant first. Always. No exceptions.
- Keep it cool. High heat is the enemy. Use a low temperature and low airflow setting.
- Dry the attachment points first. Focus on getting the roots and bonds completely dry. Trapped moisture is a fast track to matting and can weaken adhesives over time.
- Aim the nozzle down. Always point the airflow down the hair shaft, from root to tip. This smooths the cuticle, reduces frizz, and prevents tangles.
Styling with Heat The Smart Way
One of the best parts about quality human hair extensions is being able to curl and straighten them just like your own hair. But with great power comes great responsibility. Heat damage is permanent—once the hair is fried, there’s no bringing it back.
Avoiding heat damage is absolutely critical. Studies show that over 70% of extension wearers experience issues like premature shedding or breakage from using hot tools without proper protection.
The golden rule of heat styling is to always, always use a quality heat protectant spray. Mist it evenly from the mid-lengths to the ends before a hot tool gets anywhere near your hair.
Pay close attention to the temperature, too. Most tools get way hotter than you actually need. A setting between 300-350°F (150-175°C) is usually more than enough to style your extensions effectively. You should never need to crank it up to the highest setting.
For more tips on getting that flawless look, check out our seamless blending hair extensions guide. By pairing the right tools with gentle habits, you can style to your heart's content and keep your extensions looking amazing for months.
Your Nightly Routine for Tangle-Free Mornings
How you put your hair to bed is one of the most overlooked, yet absolutely crucial, parts of keeping your extensions looking amazing. Those eight hours you spend sleeping can be a minefield of friction, leading to tangles, matting, and a ton of unnecessary stress on your bonds or wefts. A simple, consistent nightly routine is your secret weapon against waking up to a frustrating mess.
Think about it: every time you toss and turn, your hair is rubbing against your pillowcase. Over a week, that adds up to a lot of friction. The few minutes you take to prep your hair before you sleep will save you so much detangling time in the morning and seriously extend the life of your extensions.
Secure Your Hair to Prevent Nighttime Tangles
First things first, you have to gently secure your hair. Leaving your extensions to fly free overnight is basically rolling out the welcome mat for knots and matting, especially right up at the roots. The whole idea is to keep the hair contained and moving as one unit to cut down on that friction.
Your best bets are simple, loose styles that don't tug on your scalp or attachments.
- A Loose Braid: This is the gold standard, and for good reason. A single, loose braid gathers all the hair together, stopping individual strands from weaving into knots while you sleep.
- A Low Ponytail: Not a braid person? No problem. A very loose, low ponytail secured with a soft scrunchie works beautifully. Just make sure it sits at the nape of your neck so there's zero tension.
Whatever you do, never sleep with your hair in a high, tight ponytail or bun. These styles put way too much strain on the attachments and can lead to slippage and even damage to your natural hair. Remember, the goal is gentle containment, not tight restriction.
The Power of a Silk or Satin Pillowcase
If you make one tiny change to your routine, let it be this: switch to a silk or satin pillowcase. Your standard cotton pillowcase might feel soft, but its texture actually grabs and pulls at your hair cuticles. This is a one-way ticket to friction, frizz, and moisture loss.
Silk and satin, on the other hand, create a smooth, slick surface. Your hair glides right over the fabric instead of getting snagged. It’s a small swap with some pretty incredible benefits for your extensions.
Switching to a silk or satin pillowcase is more than just a little luxury—it's a practical, game-changing tool for hair extension care. It slashes the friction that causes tangles and breakage, and it even helps your hair hold onto the moisture it needs to stay soft and healthy.
This easy win makes a surprisingly huge difference. You'll wake up with smoother hair, fewer tangles, and even your skin will thank you.
The Golden Rule: Never Sleep on Wet Extensions
Finally, and I can't stress this enough: your hair and extensions must be 100% dry before your head hits the pillow. This is non-negotiable.
Going to bed with damp hair is the absolute fastest way to cause severe, sometimes irreversible, matting at the roots. Moisture can weaken the adhesive on tape-ins or soften keratin bonds, and it creates the perfect storm for tangles to form and tighten into stubborn knots as you sleep.
If you're an evening hair-washer, build in enough time to dry your hair completely, focusing on the attachment points. Use your blow dryer on a low, cool setting to make sure every last bit of moisture is gone from the roots before you even think about braiding it for the night. This one habit will save you from one of the most damaging and difficult extension problems there is.
Stylists are always preaching about smart nighttime habits for a reason. As you can discover more research about hair extension trends, you'll see how professional advice always circles back to these simple, effective practices.
Why You Can't Skip Your Salon Visits
Think of your at-home hair care routine as the daily maintenance for a luxury car—it keeps things running smoothly. But professional salon visits? That’s the essential tune-up that prevents the engine from failing. You can be incredibly gentle with your washing, braid your hair every single night, and use all the right products, but semi-permanent extensions absolutely need an expert’s touch to go the distance.
Your stylist isn't just the person who put your hair in; they're your partner in protecting your investment and, more importantly, your natural hair. These check-ins are about managing the one thing you can't control: your own hair growth. As your hair gets longer, the extension attachments move further down the shaft, creating the perfect storm for tangles, matting at the roots, and unnecessary stress on your scalp.
The 6 to 8 Week Rule
For tape-ins, wefts, and keratin bonds, that 6 to 8-week mark is your magic number for a maintenance appointment. This isn't just a friendly suggestion—it's a non-negotiable for keeping your hair healthy and your extensions looking seamless.
So, what actually happens when you’re in the chair? Your stylist performs a few key tasks you just can't do at home.
- For Tape-Ins & Some Wefts: They'll gently remove each piece, get your natural hair sparkling clean, and then reapply the extensions nice and close to the scalp again.
- For Beaded Wefts & I-Tips: It's all about the "lift." They'll open the beads, slide the extension back up toward the root where it belongs, and clamp it securely in place.
- A Full Health Check: This is their chance to play detective. They'll get a close look at your scalp and the bonds, catching any tiny signs of stress or potential issues long before they become real problems.
Skipping these appointments is, without a doubt, one of the biggest mistakes you can make. It's the fast track to the exact kind of damage everyone wants to avoid. The numbers don't lie.
Regular professional check-ups every 6 to 8 weeks are a must. In fact, 35-40% of wearers report that their extensions loosen or slip out without this crucial upkeep. Discover more insights about the hair extensions market
When to See Your Stylist Sooner
While 6 to 8 weeks is the general rule, your hair has its own way of telling you when it needs help. If you spot any of these red flags, it’s time to call your stylist, even if you’re not "due" for a visit.
- Visible Attachments: If you can see the tapes or bonds when you pull your hair up, they’ve grown out too far.
- Pulling or Discomfort: Extensions should feel like a part of you, not a burden. Any feeling of tightness or pain is a clear signal that something needs adjusting.
- Slipping or Major Shedding: Losing a strand here and there is normal, but if an entire piece comes loose or you’re noticing more shedding than usual, book an appointment.
Great hair extensions are a team effort. Your daily routine keeps the hair itself in beautiful condition, but it's your stylist's expertise that keeps the foundation strong and secure. To dive deeper into making it a successful partnership, check out our maintenance tips for keeping your hair extensions fabulous.
Answering Your Biggest Hair Extension Questions
Even with the best daily routine, life throws curveballs that can leave you wondering if you're doing the right thing for your extensions. Proper maintenance isn't just about the day-to-day—it's about knowing how to handle those tricky, real-world moments.
This is your go-to guide for the most common questions we get from clients. Think of it as your troubleshooting manual for everything from vacation care to product confusion. We're tackling the big concerns head-on to give you clear, confident answers.
Can I Go Swimming with My Hair Extensions?
Yes, you absolutely can, but you need a solid game plan. Just diving in on a whim is a recipe for a matted, tangled disaster. Chlorine and saltwater are incredibly dehydrating and will strip moisture from your extensions, leaving them feeling like straw.
A little prep work before you hit the water makes all the difference.
- Saturate Your Hair First: Get your hair completely wet with clean water from a shower or bottle. Hair acts like a sponge—if it’s already full of clean water, it can't absorb as much of the damaging chlorine or salt.
- Add a Protective Layer: Work a generous amount of leave-in conditioner through the mid-lengths and ends. This creates a barrier that helps shield the hair.
- Braid It Loosely: This is non-negotiable. Securing your hair in a low, loose braid is the single best way to keep the swirling water from creating massive tangles.
The after-swim care is just as critical. You have to wash your hair as soon as you're done swimming. Use a gentle, extension-safe clarifying shampoo to get every last trace of salt or chlorine out, then follow it up with a deep conditioning treatment on the ends to put all that lost moisture back in.
What Products Should I Absolutely Avoid?
Walking down the haircare aisle can feel like a minefield. The good news is that protecting your investment really comes down to avoiding a few key ingredients that are known enemies of hair extensions. Using the wrong stuff can weaken the bonds, cause slippage, and strip the hair, drastically shortening its lifespan.
Here’s a quick list of what to watch out for on the label:
- Sulfates (SLS & SLES): They create that rich lather we often associate with being "clean," but these harsh detergents strip away natural oils and moisture, leaving extensions brittle and dry.
- High Alcohol Content: Many hairsprays, mousses, and other styling products are loaded with drying alcohols. Over time, they dehydrate the hair and can even start to break down the adhesive on tape-ins and keratin bonds.
- Oils and Silicones at the Roots: While fantastic for nourishing your ends, applying serums or conditioners with heavy oils or silicones near your attachment points is a huge mistake. These ingredients create slip, which is exactly what you don't want—it can cause tapes, bonds, or beads to slide right out.
The rule of thumb is simple: if a product isn't specifically labeled "extension-safe," proceed with caution. Sticking to products formulated for extensions takes the guesswork out and ensures you aren't accidentally sabotaging your style.
How Can I Fix Dry and Brittle Extensions?
It’s a super common issue. Since extensions don’t get that natural, nourishing oil (sebum) from your scalp, they’re much more likely to get dry, especially on the ends. The good news is that you can almost always bring them back to life with a little extra TLC.
The solution is targeted, intensive hydration. Start by adding a high-quality, hydrating hair mask into your routine about once a week. Apply it generously from the mid-lengths down, making sure to avoid the root area completely. For a serious moisture boost, wrap your hair in a warm towel and let the treatment soak in for 20-30 minutes before rinsing.
For daily care, a lightweight hair oil can work wonders. Just a few drops of argan or jojoba oil on the very ends each day helps seal the cuticle and prevent splits. And remember, the best defense is a good offense—always, always use a quality heat protectant spray before picking up any hot tool.
What Should I Do About Matting at the Roots?
Matting at the scalp is probably the most serious issue an extension wearer can face, and it requires immediate, gentle action. It usually happens from not separating the bonds daily, going to bed with wet hair, or pushing maintenance appointments back too far.
If you catch small tangles early, you can often work them out with your fingers. Gently pull the tangled strands apart, starting from the outside of the knot and moving inward. Whatever you do, don't try to rip through a tangle with a brush.
For knots that are a bit more stubborn, you'll need some backup.
- With one hand, hold the base of the extensions firmly against your scalp. This prevents pulling and tension on your natural hair's roots.
- Lightly mist a detangling spray on the matted area to give it some slip.
- Using a pintail comb, gently pick at the tangle from the very bottom, slowly working your way up until it comes loose.
If the matting is severe, dense, and right up against the scalp, stop. Do not try to fix it yourself. You risk pulling out your own hair and causing real damage. This is when you need to make an emergency call to your stylist. They have the right tools and know-how to safely remove the matting without wrecking your natural hair.
Ready to experience the best in hair extension application and care? The expert stylists at Hairicc are dedicated to giving you the flawless, long-lasting look you deserve. Book your consultation with us today and discover the difference professional artistry makes.