The perm you’ve been dreaming about? It doesn’t just happen the day you walk into the salon. The real magic begins in the weeks leading up to your appointment. Getting your hair ready means more than just showing up—it involves a little TLC with deep conditioning, skipping the shampoo for 24-48 hours right before you come in, and snipping off any damaged ends. This prep work is your insurance policy for getting gorgeous, long-lasting curls.
Thank you for reading this post, don't forget to subscribe!Setting the Stage for a Perfect Perm
Think of your hair as the foundation for your new style. A perm solution works by breaking down and then reforming the protein bonds in your hair, which is what allows us to create those beautiful curls and waves. If your hair is already dry, weak, or damaged, this chemical process can do more harm than good, leaving you with frizz and breakage instead of the bounce you wanted.
Starting with healthy, hydrated hair is absolutely crucial. And what that looks like can be a little different for everyone.
What Your Hair Type Needs Before a Perm
Your hair's unique texture and history play a big role in how you should prepare.
- Fine Hair: If your hair is on the finer side, it's more susceptible to damage. We highly recommend doing a few protein treatments beforehand to build up its strength and resilience.
- Thick Hair: While naturally stronger, thick hair can sometimes resist the perm solution. Making sure it’s deeply moisturized helps the chemicals penetrate evenly, which is key for a consistent curl pattern.
- Color-Treated Hair: Your hair has already been through one chemical process, which makes it more vulnerable. Extra deep conditioning is a must, and it's best to schedule your perm well after any recent color appointments.
- Virgin Hair: Even if your hair is completely unprocessed, it’s not off the hook! Proper hydration is still essential to ensure your new curls are soft and touchable, not dry and brittle.
To give you a better idea of what happens in the salon chair, this graphic breaks down the key stages of the perming process itself.
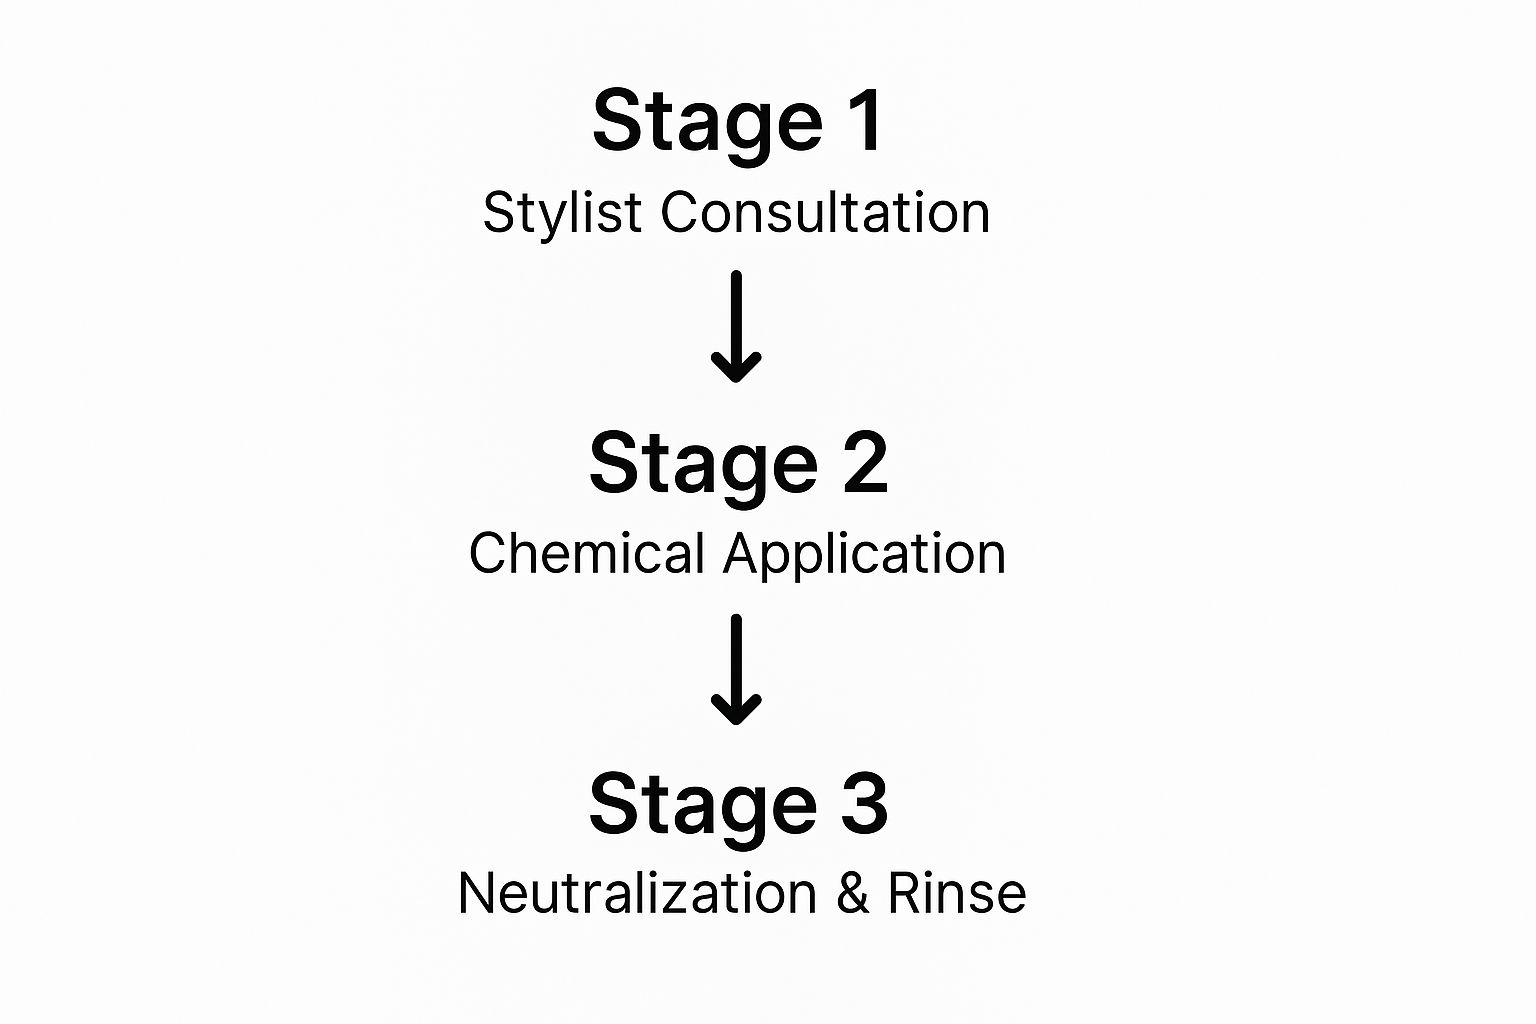
As you can see, it’s a multi-step chemical transformation, which really drives home why starting with a healthy head of hair is so important.
Our stylists are always talking about this! In fact, a 2020 survey of salon professionals found that around 75% tell their clients to avoid washing their hair for 24 to 48 hours before their perm. Why? This simple trick lets your scalp's natural oils build up, creating a protective barrier against the perm solution. Additionally, nearly 60% recommended getting a trim about two weeks prior to snip off split ends and prevent any further damage. You can find more insights from salon professionals on pre-perm care.
To make it even easier, here’s a quick timeline you can follow to get your hair in prime condition for its big day.
Your Pre-Perm Hair Prep Timeline
This simple schedule breaks down what to do and when, so you can walk into your appointment with confidence.
| Timeframe | Action Item | Why It Matters |
|---|---|---|
| 2-4 Weeks Out | Start weekly deep conditioning or hair masks. | This builds moisture and protein reserves, strengthening the hair shaft from the inside out. |
| 2 Weeks Out | Get a light trim to remove split ends. | Clean ends ensure the perm solution is absorbed evenly and prevents further breakage post-perm. |
| 48 Hours Out | Last shampoo before your appointment. | This allows your scalp's natural, protective oils (sebum) to accumulate. |
| 24 Hours Out | Avoid all heat styling (flat irons, curling wands). | Heat can temporarily alter your hair's protein structure, so you want a clean, natural slate. |
| Day Of | Arrive with clean, dry, product-free hair. | Your stylist needs to assess your hair in its natural state to create the best curl for you. |
Following these simple steps will make a huge difference in your final results, helping you and your stylist achieve the beautiful, healthy-looking perm you're looking for.
Your One-Month Pre-Perm Game Plan
Think of the four weeks before your perm appointment as a training montage for your hair. This is your window to get your strands in peak condition for the chemical process, focusing on building up strength and locking in moisture.
This isn’t about just slapping on any old hair mask and calling it a day. The real secret is creating the perfect balance between moisturizing deep conditioners and strengthening protein treatments. If you go too heavy on the protein, you risk making your hair brittle and prone to snapping. On the other hand, too much moisture can leave it feeling mushy and unwilling to hold a curl. Nailing that balance is the key to getting a perm that’s bouncy, healthy, and lasts.
Finding Your Hair's Perfect Balance
So, how do you know what your hair needs? It all comes down to its current condition.
Let's say you have fine hair or hair that's been colored before and feels a little weak. You'll want to lean more into protein. A good schedule might be a protein treatment in week one and week three, with a hydrating mask sandwiched in between on weeks two and four.
But if your hair feels perpetually dry or coarse to the touch, hydration is your best friend. In this case, I'd suggest using a moisturizing mask for the first three weeks. Then, in that final week before your appointment, finish with a light protein treatment to give your hair the structure it needs to form the perfect curl.
A Stylist's Trick: Unsure what your hair is thirsty for? Try the "stretch test." Carefully take a single, wet strand of hair and gently pull it. If it snaps right away without any stretch, it needs moisture. If it stretches and stretches, feeling a bit limp or gummy, it's begging for protein.
Put Away the Hot Tools
One of the most important things you can do during this month-long prep is to give your hot tools a vacation. Seriously. Put the blow dryer, flat iron, and curling wand on a shelf.
Every time you apply high heat, you're stressing the hair's protective outer layer, the cuticle. A weak, compromised cuticle makes your hair far more susceptible to damage during the perm process.
By taking a break from heat styling, you’re letting your hair's natural strength and integrity build back up. It’s a simple step, but it ensures your hair is in the best possible shape for its big transformation. This kind of gentle care is an investment in your future curls, much like knowing how to keep your curls healthy during summer is crucial for long-term health.
Getting Ready Two Weeks Before Your Perm
With your perm appointment at CODEsalon just two weeks away, it's time to dial in your hair care routine. Think of this period as the final prep stage, where you're focused on gentle maintenance to get your hair and scalp in the perfect condition for the big day.
This is the point where you want to hit pause on any harsh treatments. Stop using intense clarifying shampoos or aggressive scalp scrubs. While they have their place, right now they can strip away the natural oils that protect your scalp. A perm involves chemicals, and that natural barrier is your best friend for preventing irritation.
The Pre-Perm Trim and Final Touches
The two-week window is the absolute sweet spot for a pre-perm trim. A light dusting to snip off any split ends is a game-changer for getting an even, beautiful curl. Damaged ends just don't take the perm solution consistently, which can lead to frizz and uneven texture. Just don't go for a major chop—we still need enough length to work with the perm rods.
Now's also the perfect time to get on the same page with your stylist. A little prep work here goes a long way.
- Your Current Hair: Take a few quick photos in good, natural light. This helps us see your hair's true length, texture, and current condition.
- Your Dream Curls: Find 2-3 inspiration photos that show the exact wave or curl you're hoping for.
Sending these pictures ahead of time is one of the best things you can do. It lets your stylist get a clear vision of your goal, make sure it’s a realistic fit for your hair, and have all the right tools and rod sizes ready to go before you even walk in the door.
Taking these simple steps ensures we're perfectly aligned for your appointment. It clears up any questions and sets the stage for a smooth process and the gorgeous results you want. Plus, getting a clear picture of your goal will get you excited for the next chapter: learning how to style curly hair and embrace your new look.
The Day Before Your Perm Appointment
https://www.youtube.com/embed/oATFrmAk44w
Alright, we’re in the home stretch—the final 24 hours before your appointment at CODEsalon. Your main job right now is incredibly simple: just leave your hair alone.
Seriously. It might feel strange, but the single most important thing you can do the day before your perm is to not wash your hair.
Your scalp has a brilliant natural defense system. It produces an oil called sebum, which creates a thin, protective barrier over your skin. This little bit of natural oil acts as a buffer, helping to prevent the perm solution from causing any irritation. Trust me, your scalp will thank you for it.
Arrive with a Clean Slate
Besides skipping the shampoo, you’ll also want to avoid any and all styling products. That means no mousse, no hairspray, no gels, and not even any leave-in conditioners or oils.
Why? These products can leave a residue on your hair that gets in the way of the perm solution. If the chemicals can't soak into each strand evenly, you risk getting an uneven curl pattern—which nobody wants.
Think of it like this: your hair is our canvas. For us to create a masterpiece, we need that canvas to be completely blank. Showing up with clean, dry, product-free hair is the best way to ensure a beautiful, consistent, and long-lasting perm.
Following these simple rules sets you up for a much more comfortable experience and, most importantly, the gorgeous results you're looking forward to.
What to Expect on Your Perm Appointment Day
The big day is here! Knowing what the process will be like can help you relax and truly enjoy the experience. A few simple things can make a huge difference in your comfort and the final outcome of your perm at CODEsalon.
First up, let's talk about what to wear. You’ll be in the salon chair for a good while—most perms take anywhere from two to four hours. Comfort is everything, but the most important tip I can give is to wear a top you don’t have to pull over your head.
- Think button-down shirts, zip-up hoodies, or tops with a very wide, loose neckline.
- This little trick saves you from accidentally messing up your fresh curls when you get home and need to change.
The Final Chat and The Perming Process
When you arrive, you’ll have one last chance to go over your vision with your stylist. This is the moment to pull out those inspiration photos you’ve been saving! Showing us the exact curl you're hoping for gets us on the same page before a single roller touches your hair.
Once you're settled, we'll get started. You'll notice the perm solution has a distinct chemical smell—don't worry, that's completely normal and it will fade after the final rinse. Your stylist will apply the solution, meticulously wrap your hair in rods, and let everything process.
A quick heads-up: your curls will look much tighter right after the service than what you asked for. This is totally normal! They will gently relax and settle into their final, softer shape over the next few days.
From there, just sit back and let us work our magic. We’ll handle everything from applying the neutralizer to giving you a custom plan for maintaining your gorgeous new texture. By coming in with the right clothes, clear inspiration, and realistic expectations, you’ve done everything you need to do for a successful perm.
Answering Your Pre-Perm Questions
Even with the best plan, it’s completely normal to have a few last-minute questions before the big day. Getting them answered is the best way to walk into CODEsalon feeling totally at ease and excited for what’s next.
Let’s go through some of the most common things clients ask us.
Can I Perm My Hair If It’s Already Colored?
The short answer is yes, but timing is everything. It's really important to wait at least four to six weeks after coloring your hair before getting a perm. Think of it like giving your hair a much-needed break to recover from one chemical process before jumping into another.
Honesty is the best policy here—tell your stylist everything about your color history. Knowing what’s been done allows them to pick the right formula and, most importantly, do a strand test to make sure your hair can handle the process without any unwanted surprises.
A word to the wise for anyone with color-treated hair: a serious deep conditioning routine in the weeks beforehand isn’t just a nice idea, it’s non-negotiable.
What’s the Best Hair Length for a Perm?
The general rule of thumb is that your hair needs to be long enough to wrap around a perm rod at least two and a half times. For most people, this means your hair should be at least three to four inches long.
Ultimately, the perfect length comes down to the look you're after. Shorter hair is fantastic for creating those tight, springy curls. If you’re dreaming of looser, beachy waves, longer hair is your best bet. A good chat with your stylist will help them match the right rod size to your hair length and your style goals.
How Do I Prep If My Scalp Is Sensitive?
This is a great question. If you know your scalp can be a bit sensitive or dry, your prep work is even more critical. In the weeks leading up to your appointment, switch to gentle, hydrating scalp products. Steer clear of anything harsh, like intense scrubs or strong clarifying shampoos.
Here’s the most important tip: do not wash your hair for at least 48 hours before you come in. This lets your scalp's natural oils create a protective layer, which really helps buffer your skin from the perm solution. And of course, make sure you mention your scalp sensitivity during your consultation. If you're looking for more advice on embracing your hair's natural texture, you'll find some great tips for transitioning to natural curls.